segunda-feira, 8 de abril de 2024

SAP EWM integration with Third party system using IDOC.

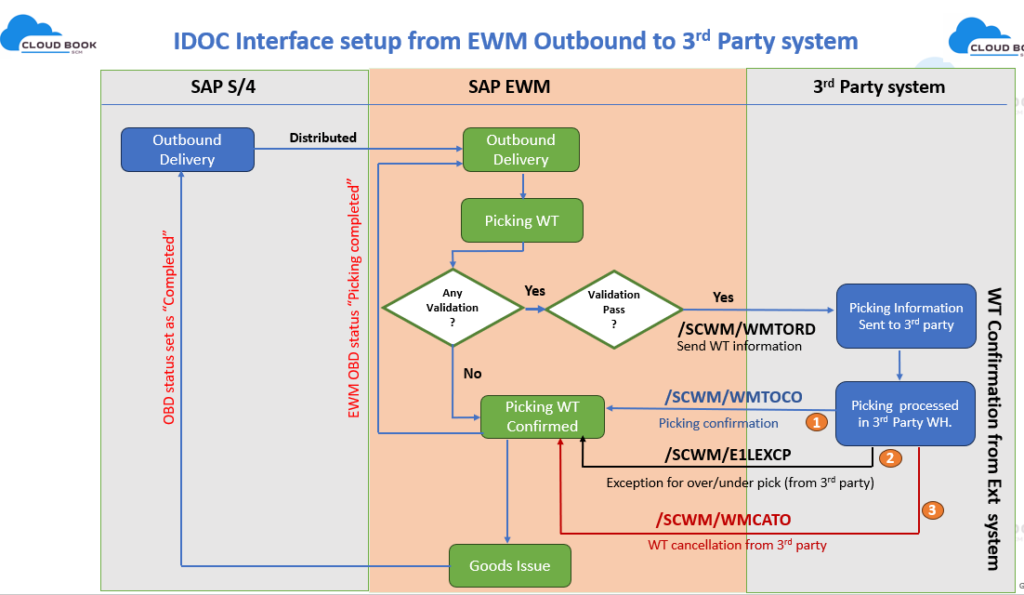
 SAP Extended Warehouse Management (EWM) enables seamless integration with third-party systems through diverse methods, such as IDoc (Intermediate Document). IDoc serves as the standard SAP format for data exchange among disparate systems. The integration of SAP EWM with a third-party system via IDoc entails multiple steps.

IDoc Interface step from EWM outbound Process to 3rds party

IDOC for sending WT to Non-SAP system.

Within SAP Extended Warehouse Management (SAP EWM), IDoc /SCWM/WMTOID01 serves as the means to transmit data pertaining to warehouse tasks from SAP EWM to linked non-SAP systems.

For each warehouse movement—be it put away, stock removal, stock transfer, or posting change—SAP EWM generates a warehouse task order. Subsequently, SAP EWM transfers the data associated with these warehouse tasks to the external connected system in the format of IDoc /SCWM/WMTOID01.

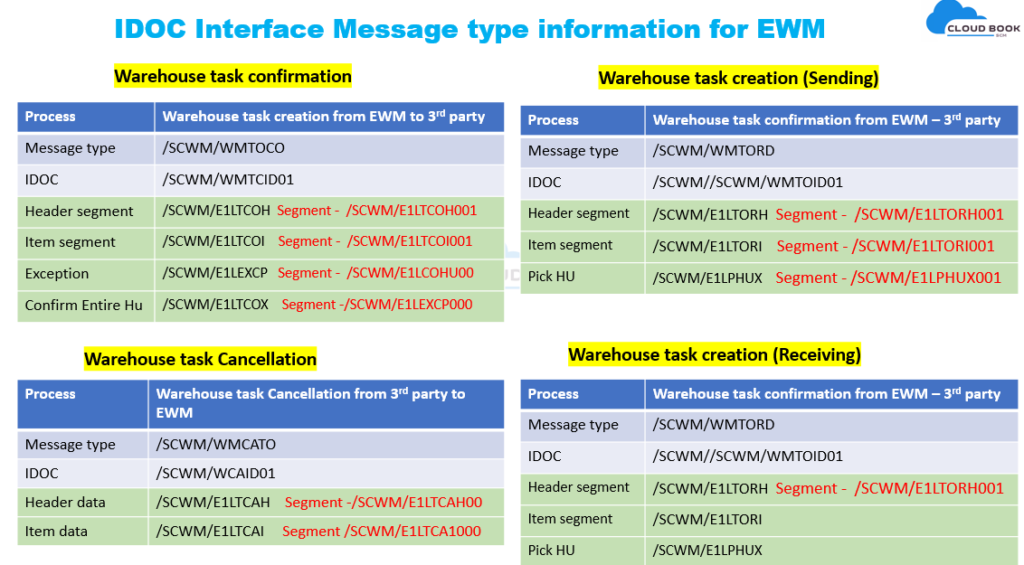
ProcessWarehouse task confirmation from EWM – 3rd party
Message type/SCWM/WMTORD
IDOC/SCWM//SCWM/WMTOID01
Header segment/SCWM/E1LTORH Segment – /SCWM/E1LTORH001
Item segment/SCWM/E1LTORI    Segment – /SCWM/E1LTORI001
Pick HU/SCWM/E1LPHUX    Segment – /SCWM/E1LPHUX001

IDOC for Receiving WT from Non-SAP system.

You use IDoc /SCWM/WMTCID01 to send warehouse-task-relevant data from the non-SAP system to SAP Extended Warehouse Management (SAP EWM).

In the non-SAP system, you generate IDoc /SCWM/WMTOID01 to transmit warehouse movement data to SAP EWM. Upon receiving the IDoc, SAP EWM generates a warehouse task to execute physical warehouse movements and update the involved storage bins. Subsequently, SAP EWM promptly confirms the creation of the warehouse task based on the received IDoc data.

ProcessWarehouse task confirmation from EWM – 3rd party
Message type/SCWM/WMTORD
IDOC/SCWM//SCWM/WMTOID01
Header segment/SCWM/E1LTORH Segment – /SCWM/E1LTORH001
Item segment/SCWM/E1LTORI  
Pick HU/SCWM/E1LPHUX   

IDOC for Confirming Warehouse task.

You use IDoc /SCWM/WMTCID01 to send confirmations from the non-SAP system to SAP Extended Warehouse Management (SAP EWM).

When conducting stock removals, you confirm entire warehouse tasks.
Regarding put away tasks, if you’re storing multiple pallets in your warehouse using a single warehouse task, you have the option to confirm the tasks item by item.
When confirming entire warehouse tasks, you’re able to input variances for individual items within the warehouse task.

ProcessWarehouse task creation from EWM to 3rd party
Message type/SCWM/WMTOCO
IDOC/SCWM/WMTCID01
Header segment/SCWM/E1LTCOH  Segment –  /SCWM/E1LTCOH001
Item segment/SCWM/E1LTCOI    Segment –  /SCWM/E1LTCOI001
Exception /SCWM/E1LEXCP   Segment –  /SCWM/E1LCOHU00
Confirm Entire Hu/SCWM/E1LTCOX    Segment -/SCWM/E1LEXCP000

Scenario:

where external systems trigger warehouse movements, which are then communicated to SAP EWM via IDoc for processing. Here’s a breakdown of the process:

  1. External System Trigger: An external system initiates warehouse movements, likely based on some business process or event.
  2. Warehouse Movement Execution: The external system handles the physical transportation of products within the warehouse based on the triggered movements.
  3. Data Transfer to SAP EWM: Once the physical movements are executed, the non-SAP system transfers the data regarding these movements to SAP EWM. This data transfer occurs via an IDoc, specifically using the IDoc type /SCWM/WMTOID01.
  4. IDoc Processing in SAP EWM: SAP EWM receives the IDoc containing warehouse movement data. Upon receiving the IDoc, SAP EWM processes the data contained within it.
  5. Warehouse Task Creation: SAP EWM creates warehouse tasks based on the data received in the IDoc. These tasks represent the actions that need to be performed within the warehouse to fulfill the movement requirements.
  6. Confirmation of Warehouse Tasks: Upon creating the warehouse tasks, SAP EWM immediately confirms them. Confirmation indicates that the tasks are accepted and will be executed within the warehouse.

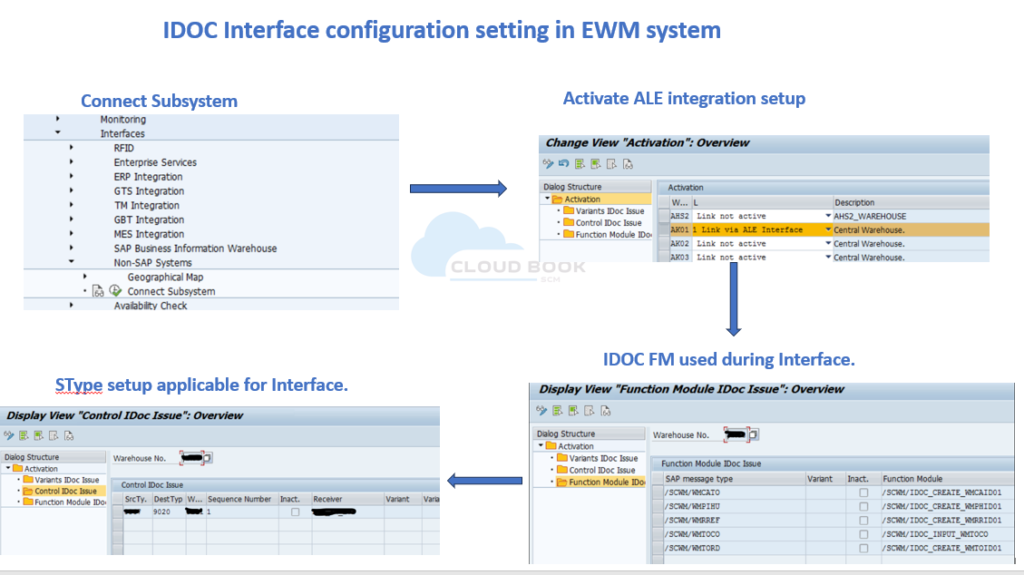
Configuration:

Create Logical system for Receiver.

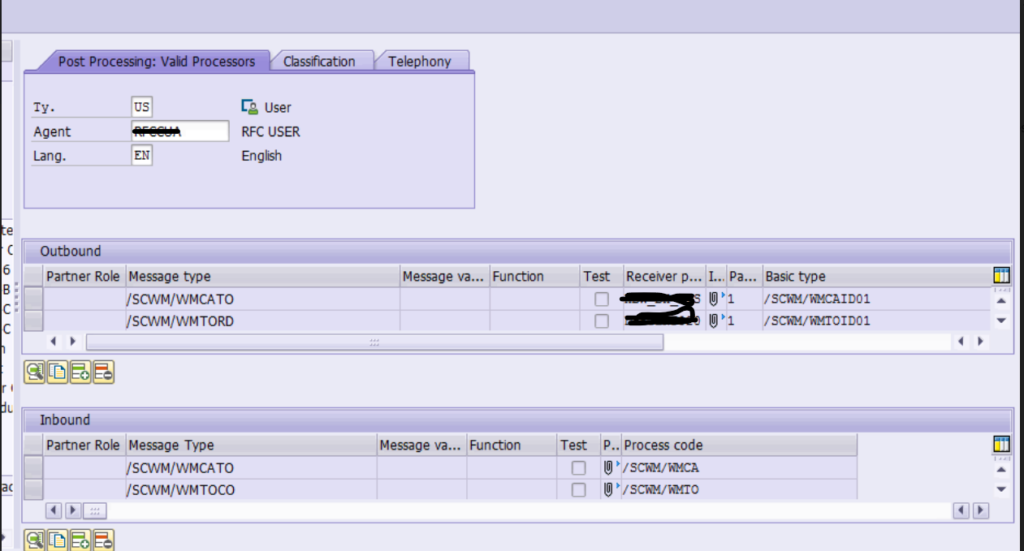
Create Partner Profile

IDOC configuration Mapping

Blog by Nitin Kumar

www.cloudbook.co.in


Source: https://cloudbook.co.in/blog/ewm-third-party-integration-with-idoc/

SAP Fiori for SAP S/4HANA – 5 Steps to Fiori Bootcamp for Customers


UPDATES - NOV/2023
- Sessions for Q1 2024 are now listed in the program information document.
- This offering now includes content on SAP S/4HANA Embedded Analytics


- This offering is valid for SAP S/4HANA Cloud, Private Edition and On-Premise deployments


SAP Fiori has evolved alongside SAP S/4HANA. As a result of the evolution in the SAP Fiori design system, technologies and tools, multiple customers ask us time and time again how they can make use of all the features in SAP Fiori in SAP S/4HANA to manage their UX adoption journey. In response, the SAP S/4HANA Customer Care and RIG (Regional Implementation Group) provide a free hands-on experience bootcamp called 5 Steps to Fiori.

Why bring your team to the 5 Steps to Fiori bootcamp?


So you are moving to SAP S/4HANA Cloud, Private Edition or On-Premise with a promise of adopting the latest and greatest innovations.  Then you will want to know that SAP Fiori is how business users consume SAP S/4HANA innovations, including:

    • Mobile access to your SAP processes


    • Embedded Analytics


    • The many new processes only available with SAP S/4HANA (think Group Reporting, Predictive MRP, Central Procurement, Automated Sales Order Extraction, and many more)


    • Intelligent technologies (think Situation Handling, Machine Learning, Robotic Process Automation)


Sounds like SAP Fiori is something you might need to know, right? Maybe you might need some skills in SAP Fiori? Maybe you need to work out how you can adopt this user experience for your business users?

In fact, SAP Fiori is the foundation for innovation at SAP, and the strategic direction for UX in SAP S/4HANA and SAP Cloud Solutions. SAP Fiori delivers more than 2K apps as an integral part of SAP S/4HANA as well as a design system, technologies, and tools that provide consistent, intelligent, and integrated user experience for SAP software across platforms and devices.

SAP Fiori has evolved alongside SAP S/4HANA.  Because of this evolution and constant change in the SAP Fiori design system, technologies, and tools, you will need to know how to deploy and adopt SAP Fiori in your business to truly embrace your UX adoption journey and manage the pace of change to these new innovations.

In response, the SAP S/4HANA Customer Care and RIG (Regional Implementation Group) would like to introduce you to a free hands-on experience bootcamp called 5 Steps to Fiori which will help you define your UX adoption strategy and gain practical hands-on skills in activities, technologies, and tools to adopt SAP Fiori UX. In this bootcamp you will also find answers to questions such as,

    • What are the steps involved in SAP Fiori Rapid Activation?


    • How to refine the delivered SAP Business Roles to match business needs?


    • How to identify the security authorization objects needed to use SAP Fiori apps?


    • Is activating and maintaining SAP Fiori a purely technical effort?


    • What SAP Fiori features should you highlight to business users to smooth onboarding and encourage adoption?


    • What can you do with the no-code/low-code key user (in-app) extensibility to enhance the delivered SAP Fiori apps in minutes?


    • How to identify quick wins in the intelligent technology use cases delivered in SAP Fiori?


    • What project activities you need to include and who needs to be involved?


    • How to evaluate SAP Partners who we want to engage for the implementation of SAP Fiori?


    • What will the business lose if we don’t use SAP Fiori in SAP S/4HANA?


What is offered in this bootcamp?


This bootcamp is offered by SAP’s S/4HANA RIG, which allows you to reach experts who have hands-on experience in SAP Fiori implementations, with well-known names in SAP’s UX area like jocelyn.darthannes.defloolesliekakisreeramjbaltazar and it should be interesting for SAP S/4HANA customers who are:

    • Starting or planning an implementation project and what to learn about SAP Fiori


    • Live after a technical conversion and want start with SAP Fiori in a next phase


    • Live with some SAP Fiori scope implemented by a partner and want get some in-house SAP Fiori knowledge


This bootcamp is offered only for SAP customers and each customer is required to participate as a team. The team must have five members, one each, from Basis, Functional, Security, Developer, and a Team Lead (who acts as the coordinator for the team). The bootcamp is designed for a team of five and we will not be able to register individuals for this program. If your organization is interested, please send your company name, company’s SAP Customer ERP Number, and the names and area of expertise of the five members who would be participating in the bootcamp from your company.

Please click here to access the program information document. where you will find:

    • Upcoming dates in your region


    • Prerequisites and a summary of the bootcamp flow


    • How to apply to get a registration form and more detailed information


If you have more questions on the prerequisites, CAL or Sandbox system provisioning or team definitions please click here to access the program FAQ.

Also note that sessions and content are delivered in English language.


What have other customers learned by joining this training?


If you are interested in listening to customer experiences while running this training, feel free to listen to our podcast where you can learn how other companies have prepared for this training and tips and tricks for organizing your team.

Inside SAP S/4HANA - Episode 65: 5 Steps to SAP Fiori: Learning Through Hands-On Activities (feat. I...


Can you mention some of the program highlights?


This bootcamp is offered by SAP’s S/4HANA RIG, which allows you to reach experts who have hands-on experience in SAP Fiori implementations.


The program highlights are shown below.


5Steps2Fiori - Program Description


Your team must consist of five members with the following expertise.


5Steps2Fiori - Mandatory Roles Pt. 1


5Steps2Fiori - Mandatory Roles Pt. 2


This program has been running for the last couple of years with positive results. You can find some comments from customers participating in this training from the last training runs per region: Americas, EMEA (Europe, Middle East, and Africa), APJ (Asia-Pacific Japan)


What is the feedback from bootcamp participants?


5Steps2Fiori - Feedback Q2 2022 All Regions


5Steps2Fiori - Feedback Q1 2022 All Regions


5Steps2Fiori - Feedback Q4 2021 All Regions


5Steps2Fiori - Feedback Q3 2021 All Regions


5Steps2Fiori - Feedback Q2 2021 All Regions


5Steps2Fiori - Feedback Q1 2021 All Regions


I hope you found this blog post helpful – feel free to leave comments and feedback, you can follow the SAP Fiori for S/4HANA tag to receive updates on blog posts here.

Becoming an SAP Fiori for SAP S/4HANA guru

You’ll find much more on our SAP Fiori for SAP S/4HANA wiki

Brought to you by the SAP S/4HANA RIG


Source: https://community.sap.com/t5/technology-blogs-by-sap/sap-fiori-for-sap-s-4hana-5-steps-to-fiori-bootcamp-for-customers/ba-p/13510161

Configuring Condition Contracts for Settlement Management in SAP S4HANA

 This technical configuration guide provides a comprehensive overview of the S/4HANA Settlement Management module, focusing on the setup and configuration of Condition Contracts. The guide covers the necessary functional prerequisites, detailed configuration steps across various IMG (Implementation Guide) paths, and the activation of key features and settings required for effective settlement management in an S/4HANA environment. The comprehensive nature of this guide makes it a valuable resource for SAP practitioners and consultants involved in the implementation and maintenance of the Settlement Management solution.


List of topics covered in this document:

  1. Functional Prerequisites for Settlement Management
  2. Configuration in the IMG (Implementation Guide)
    • Basic Settings
    • Pricing
    • Account Determination
    • Settlement Document Types
    • Settlement Process
    • Settlement Document Lists
    • Condition Contract Management
    • Condition Contract Settlement
  3. Full Service Leasing Configuration
    • Billing
    • Payment Types
    • Identification Objects

Download – Configuring Condition Contracts for Settlement Management in SAP S4HANA

quarta-feira, 13 de março de 2024

ALE settings for Quality Management Master Data

 ALE Settings for Quality Management

1 Basic ALE Settings

1.1 Define Logical System

Run Transaction SALE in Development environment.

Follow menu path IDoc Interface / Application Link Enabling (ALE) >> Basic Settings >> Logical Systems >> Define Logical System.

It is a cross client configuration.

Click on New Entry

Enter Logical System as following naming convention

SYSCLNTXXX

Here,

SYS – System name e.g. DEV- Development, QLT-Quality, PRD-Production

CLNT – Client (keep the text CLNT as it is)

XXX – Number of Client e.g. 101, 102, 103 etc.

Now, Save. It will ask for transport request. Create/assign the transport request and get this transport request transported to all the required environments. This is required activity because it will be used while creating Partner Profile. If don’t perform this activity, system will not allow you to create partner profile with logical system with this naming.


1.2 Create RFC Connection:

Run Transaction SM59 – Configuration of RFC connections

Or follow the menu path

Select ABAP Connections and click on Create

Enter the RFC Destination, Description, Target Host and instance number. System will pick the IP address automatically.

RFC destination as per following naming convention (as per logical system)

SYSCLNTXXX

Here,

SYS – System name e.g. DEV- Development, QLT-Quality, PRD-Production

CLNT – Client (keep the text CLNT as it is)

XXX – Number of Client e.g. 101, 102, 103 etc.

In Logon and Security Tab, Maintain the Logon Procedure, put destination client, User (ALEUser) and Password. And Save.

This is the procedure to create RFC Connection. You need to perform this activity in both the Sending and Receiving System. E.g. in Development Server you need to maintain Quality Server’s RFC and in Quality Server you need to maintain Development Server’s RFC.


1.3 Port Maintenance

Run the transaction WE21

Or follow the menu path


Select Port Type Transactional RFC and click on Create

Select the radio button for own port name and enter port as following naming convention (Same as logical system) on the pop up dialog box.

SYSCLNTXXX

Here,

SYS – System name e.g. DEV- Development, QLT-Quality, PRD-Production

CLNT – Client (keep the text CLNT as it is)

XXX – Number of Client e.g. 101, 102, 103 etc.

Enter the description and select the RFC destination

Now, Save.


1.4 Create Partner Profiles

Run the transaction code WE20

Or follow the menu path

Select the Partner type LS and Click on create

If you do not enter the logical system defined in step 1 then you will be facing following error

Enter the Partner number as per the logical system naming convention

SYSCLNTXXX

Here,

SYS – System name e.g. DEV- Development, QLT-Quality, PRD-Production

CLNT – Client (keep the text CLNT as it is)

XXX – Number of Client e.g. 101, 102, 103 etc.

Enter Type as US – User, Agent as user ID.

Now, Save.

The Partner profile is created. You can create Partner profile in each system as follows

System

Partner Profile

Purpose / Data flow

Development system

QLTCLNT201 (for Quality Client)

Development to Quality

PRDCLNT301 (for Production Client)

Development to Production (caution)

Quality system

DEVCLNT101 (for Development Client)

Quality to Development (caution)

PRDCLNT301 (for Production Client)

Quality to Production

Production system

DEVCLNT101 (for Development Client)

Production to Development (caution)

QLTCLNT201 (for Quality Client)

Production to Quality (caution)

2 Message Types Settings for Quality Management

There are following standard message types available in SAP for Quality Management Master Data.

Message Type

Description

QPGR

Replication of QM Code Groups/Catalogs

QPMK

Replication of QM master inspection characteristics (ALE)

QSMT

Replication of QM inspection methods

MATQM

Replication of QM inspection setup

INSPECTIONPLAN_CREATE

Create inspection plan


2.1 Code Groups (Message Type QPGR)

We have to following to manage ALE for message type QPGR

Outbound parameter in development server for QLTCLNT201

Inbound parameter in Quality server for DEVCLNT101.

2.1.1 Set outbound parameter in development server for QLTCLNT201

Now, login to development server

In Transaction WE20 (Partner Profiles) select the required partner profile (e.g. QLTCLNT201 Quality Client 201) under the Logical system.

Click on create outbound parameter

In the next screen enter message type QPGR, Select Transfer IDOC immediately. Enter basic type QPGR01. And press enter.

After Enter

Now, Save. E.g. in development client you have set outbound parameter for QLTCLNT201.

2.1.2 Set inbound parameter in Quality server for DEVCLNT201

Now, login to Quality System to set inbound parameter.

Scroll down and click on create inbound parameter

Enter Message Type QPGR and Process Code BAPI and select Trigger immediately option.

Now, Save.

2.1.3 Send Code Group

Now, you can send the code groups using QL41 (Send Code Group) from Development server to Quality Server.


2.2 Master Inspection Characteristics (Message Type QPMK)

We have to following to manage ALE for message type QPMK

Outbound parameter in development server for QLTCLNT201

Inbound parameter in Quality server for DEVCLNT101.

2.2.1 Set outbound parameter in development server for QLTCLNT201

Maintain outbound parameter as below screenshot

2.2.2 Set inbound parameter in Quality server for DEVCLNT201

Maintain inbound parameter as below screenshot

2.2.3 Send Master Inspection Characteristics

Now, you can send the code groups using QL21 (Send Master Inspection Characteristics) from Development server to Quality Server.

2.3 Inspection Methods (Message Type QSMT)

We have to following to manage ALE for message type QSMT

Outbound parameter in development server for QLTCLNT201

Inbound parameter in Quality server for DEVCLNT101.

2.3.1 Set outbound parameter in development server for QLTCLNT201

Maintain outbound parameter as below screenshot

2.3.2 Set inbound parameter in Quality server for DEVCLNT201

Maintain inbound parameter as below screenshot

2.3.3 Send Inspection Methods

Now, you can send the code groups using QL31 (Send Inspection Methods) from Development server to Quality Server.

2.4 Material Inspection Setup (Message Type MATQM)

We have to following to manage ALE for message type MATQM

Outbound parameter in development server for QLTCLNT201

Inbound parameter in Quality server for DEVCLNT101.

2.4.1 Set outbound parameter in development server for QLTCLNT201

Maintain outbound parameter as below screenshot

2.4.2 Set inbound parameter in Quality server for DEVCLNT201

Maintain inbound parameter as below screenshot

2.4.3 Send Inspection Setup

Now, you can send the code groups using QL11 (Send Inspection Setup) from Development server to Quality Server.

2.5 Inspection Plan (Message Type INSPECTIONPLAN_CREATE)

We have to following to manage ALE for message type INSPECTIONPLAN_CREATE

Outbound parameter in development server for QLTCLNT201

Inbound parameter in Quality server for DEVCLNT101.

2.5.1 Set outbound parameter in development server for QLTCLNT201

Maintain outbound parameter as below screenshot

2.5.2 Set inbound parameter in Quality server for DEVCLNT201

Maintain inbound parameter as below screenshot

2.5.3 Send Inspection Plan

There is no transaction code available for sending inspection plan.

But, there is an executable Program (RQ_PLAN_CREATE_SAMPLE_FILE) available in SAP. You can execute it using transaction SE38.

The Program has a limitation. The parameter ‘receiver’ (logical system) in the program is set as no display. So, when the user run the program, the user will not be able to define the destination logical system and when you execute the program without destination, the IDoc will get failed. As the IDoc doesn’t have the destination address. (see the below screenshot)

If you run the program in debugging mode (by putting break point), you will be able to change the parameter ‘receiver’ and IDoc will get processed successfully.

There are few alternatives to achieve sending of inspection plan with the help of Developer.


Option 1: The developer can enhance (implicit enhancement spot available to have additional screen parameters) the program and put an additional screen parameter (logical system) and then pass the value of the parameter to ‘receiver’. This will allow the user to define destination.


Option 2: The Developer can create a custom program with additional parameter and then call the standard program within the same with passing all the parameter.


Option 3: The Developer can copy the standard program into a custom program and have this parameter ‘receiver’ as display.


Source: https://community.sap.com/t5/enterprise-resource-planning-blogs-by-members/ale-settings-for-quality-management-master-data/ba-p/13303257