quarta-feira, 31 de janeiro de 2018

SAP Document Reversal

Types of Allowed SAP Document Reversal

When we talk about reversing documents in SAP, there are different types of reversal scenarios.
  1. Individual SAP Document Reversal
  2. Reversal of Reversed Document
  3. Mass Reversal
  4. Cleared Items Reversal
  5. Accrual/Deferral Documents Reversal
These types of SAP document reversal are explained below.

Individual SAP Document Reversal

Under individual SAP document reversal, we can reverse one document at a time. Suppose the user has posted a document wrongly, now they want to reverse the same and post a new document again.
Menu Path: SAP Menu -> Accounting -> Financial Accounting -> General Ledger -> Document -> Reverse -> Individual Reversal
Transaction code: FB08
Here, we are taking an example of simple Rent Posting (document number 5) which needs to be reversed. Follow the menu path as specified above or type FB08 in the command field.
Initial Screen of FB08 Transaction
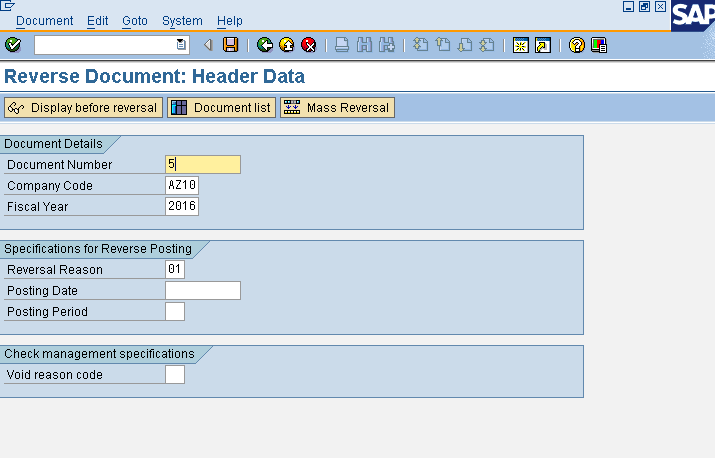
Enter the following information on the screen:
  1. Document number: Number of the document for which reverse posting is to be created.
  2. Company Code: Company code for which document is to be reversed.
  3. Fiscal year: The fiscal year in which the document is created.
  4. Reversal Reason: We need to give a reversal reason at the time of reversal. The reason for the reverse posting is noted in the reversed document, the field is necessary to know why the reversal is done. The reason for reversal also determines whether the reversed document is allowed to have an alternative posting date and whether the reverse document is to be created from negative postings (explained below in Accrual/Deferral documents reversal).
  5. Posting Date: At the time of reversal we need to give the reversal date. If we do not give the reversal date, document is reversed on original document posting date.
  6. Posting Period: Period should be open for SAP document reversal.
  7. Void Reason Code: Enter the reason to void the check, if the document is allotted check for payment.
We can see the document posted before reversal by clicking  icon.
Document Before Reversal Display
After this, select the back-arrow button and select save button. Here in this example, we are leaving the posting date blank, so the document will be reversed on original posting date. We can see the reversed document by entering document display transaction code in command field FB03, document #5 was reversed by document #24.
Initial Screen of Document Display
Document Entry View Post Reversal
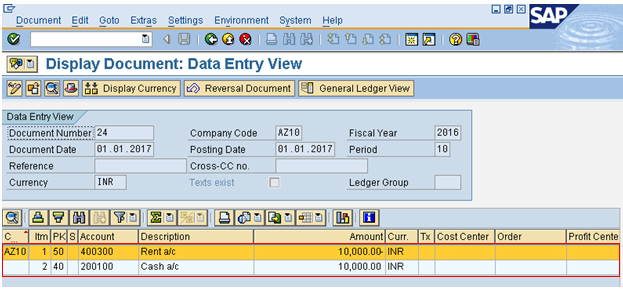
We can see that the document is reversed as rent is credited and cash is debited. Although reversed document is part of G/L posting, document type for G/L posting is SA but document type for reverse document is AB, this helps in easy identification of the document.

Reversal of Reversed Document

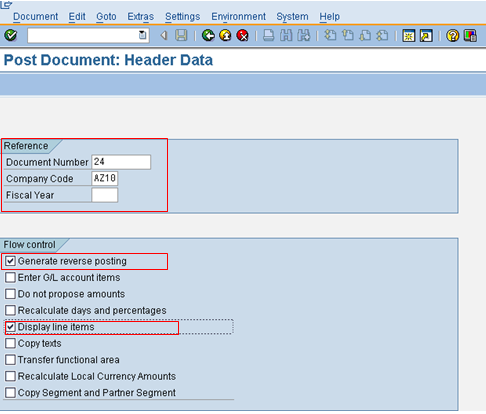
For reversal of a reversed document, just go to document posting by entering transaction F-02 (G/L Document Posting) in the command field and then go to Menu -> Document -> Post with reference.
Enter the following data:
  • Document number
  • Company code
  • Select generate reverse posting
  • Select Display line item checkbox
Finally, save the document.
Initial Screen of Post with Reference
Post Document Display Overview
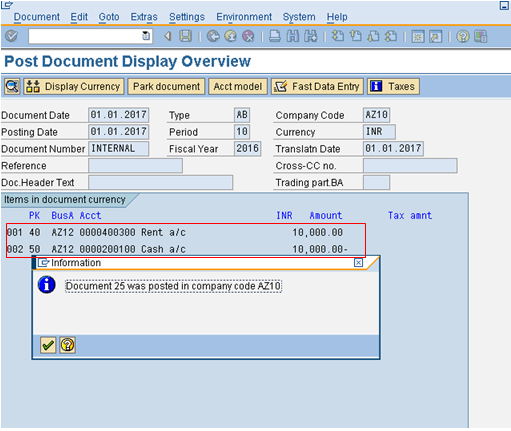
We can see the reversal of a reversed document below as the rent is again shown as debit.

Mass Reversal

Mass reversal is used to reverse more than one document at a time. The document numbers can be continuous or random.
Menu Path: SAP Menu -> Accounting -> Financial Accounting -> General Ledger -> Document -> Reverse -> Mass Reversal
Transaction code: F.80
Mass Reversal Initial Screen
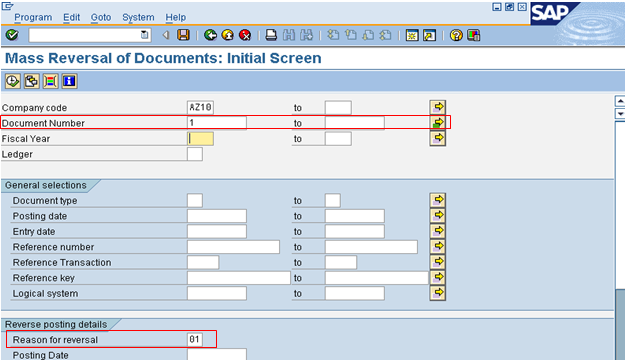
For mass reversal, we can select random document numbers or range of documents. We even have the option to exclude some documents from the single values and range of documents. Use  buttons to make selection of document numbers, also give reversal reason as 01.
Document Selection Screen
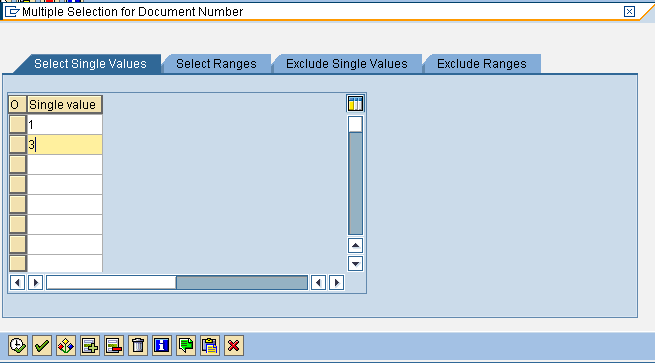
Here, we have selected Document 1 and 3 for reversal, after that we will execute the test run. We can see below that document 3 can be reversed while document 1 cannot be reversed as document was already reversed in the test run result screen.
Test Run Result Screen
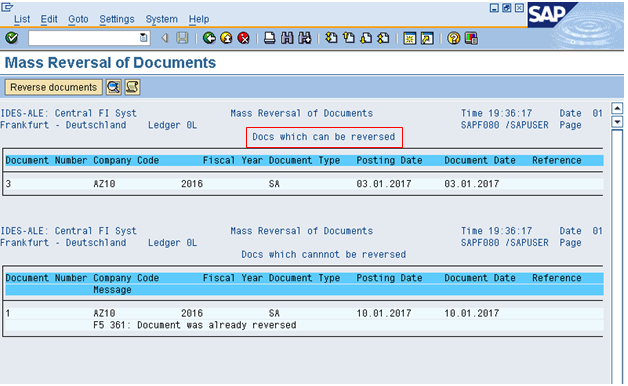
Reverse the document by clicking  icon, and the document number 3 will get reversed.

Cleared Item Reversal

Cleared items are the documents in SAP that do not have any pending obligations. These documents are used to offset the dues of vendor, customer and G/L accounts. In this tutorial, we will take an example of a vendor payment.
Step 1:
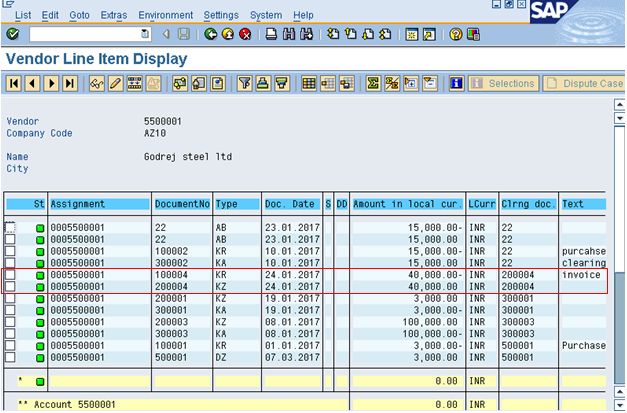
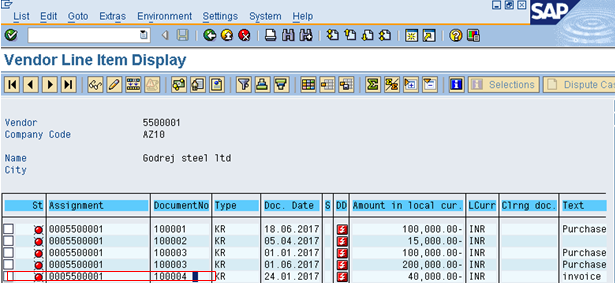
We can view the vendor line item report by entering the transaction code FBL1N in the command field. Here, for Vendor Account # 5500001 in Company Code AZ10, select Cleared item radio button and normal item check box. We can see that the Document # 100004 is for invoice which is cleared by document # 200004 which is payment against invoice, so document# 200004 is the clearing document.
Line Item Display for Vendor
Step 2:
Now, suppose there is a stop payment against the Document# 200004 (clearing document), then it should be reversed, and document# 100004 should appear as open item category. To do this we have to perform two actions:
  1. Reset Cleared Items: This is done to mark it as open. After this, there will be no link between the invoice (document #100004) and the payment document (document #200004).
  2. Reverse document #200004.
Step 3:
Menu Path: SAP Menu -> Accounting -> Financial Accounting -> General Ledger -> Document -> Reset Cleared items
Transaction code: FBRA
Enter the clearing document number 200004, company code, fiscal year and press save. Then, click  button. Give the reversal reason 01 and press enter. The system will show a message that clearing 200004 is reset, press enter. The system will show the message that the document was posted.
Reset Cleared Item Screen
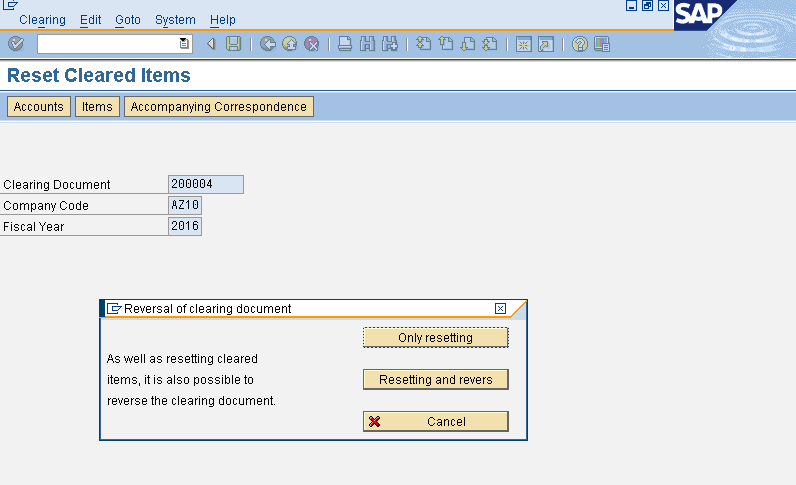
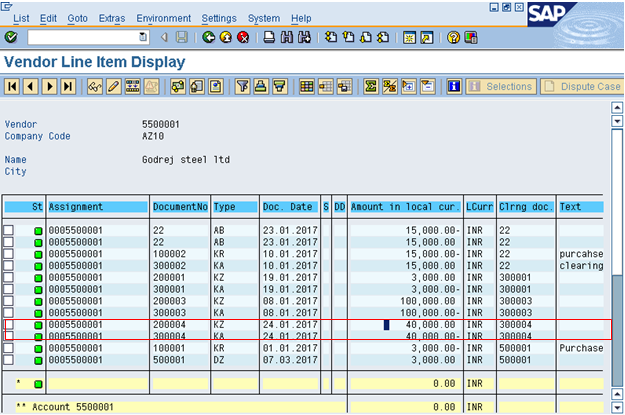
After this we can see that document # 100004 will again appear as open in the vendor report.
Open Document in Vendor Line Items Report
And, the document #200004 is cleared by the document #300004.
Cleared Documents in Vendor Line Items Report

Accrual/Deferral Document Reversal

Accrual of an expense is reporting an expense in the period in which they occur irrespective of the payment made and Deferral is payment made in one period, which will be reported in the later period.
Step 1:
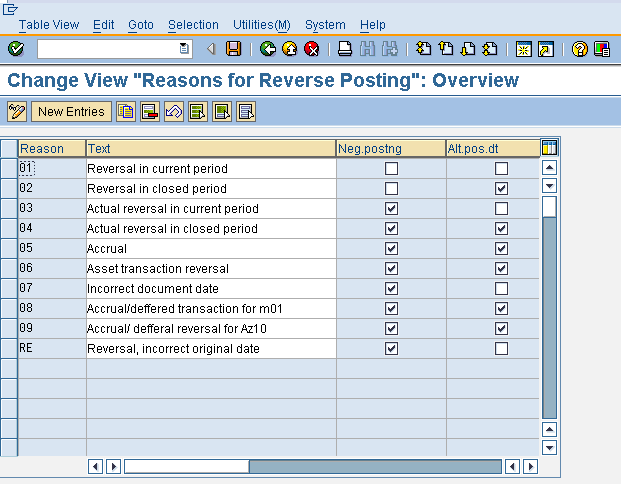
Let’s start with defining a reversal reason in customizing.
Menu Path: SPRO -> Financial Accounting -> G/L Accounts -> Business Transactions -> Adjustment Posting/Reversal -> Define Reason for Reversal
Then, click New Entries button and define Reason 09 as explained below.
  • Negative posting: When we reverse a transaction, it reduces from the same side instead of showing it on the other side. So, reverse of rent provision will be shown as a negative balance on the debit side instead of the credit side.
  • Alternative posting date: If we do not select this, the system allows us to reverse document only on the original posting date.
Define New Reason for Reversal
Reasons of Reversal
Reasons of Reversal
Step 2:
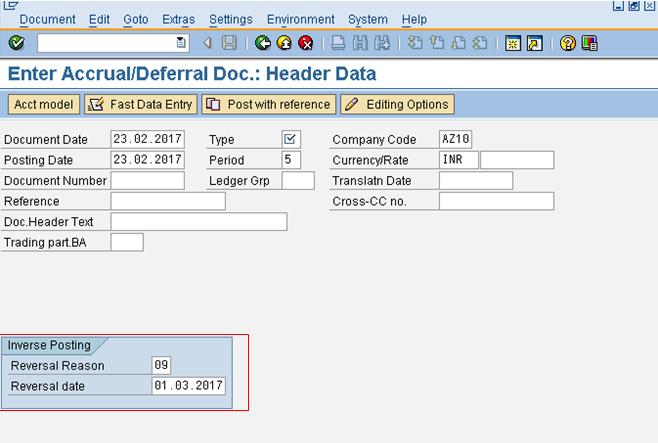
Next, enter Accrual/Deferral document.
Menu Path: SAP Menu -> Accounting -> Financial Accounting -> General Ledger -> Periodic Posting -> Closing -> Valuate-> Enter Accrual/Deferral Document
Transaction code: FBS1
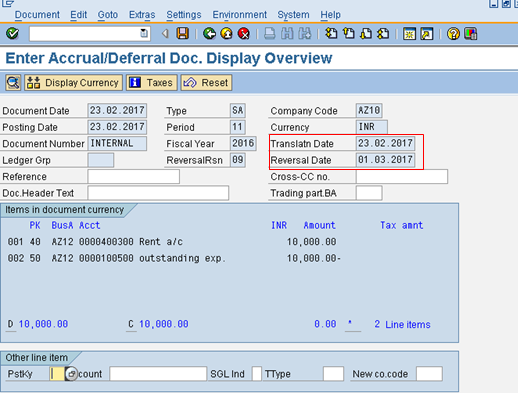
We will take an example of provision for rent posting to explain the concept. Provisions are made in one month and the same is reversed on 1st working day of the next month. Enter FBS1 in the command field and provide a reversal reason and a reversal date. For example, rent provision is made on 23.02.2017 and reversed on 01.03.2017.
Initial Screen Accrual/Deferral
Accrual/Deferral Document Display
Step 3:
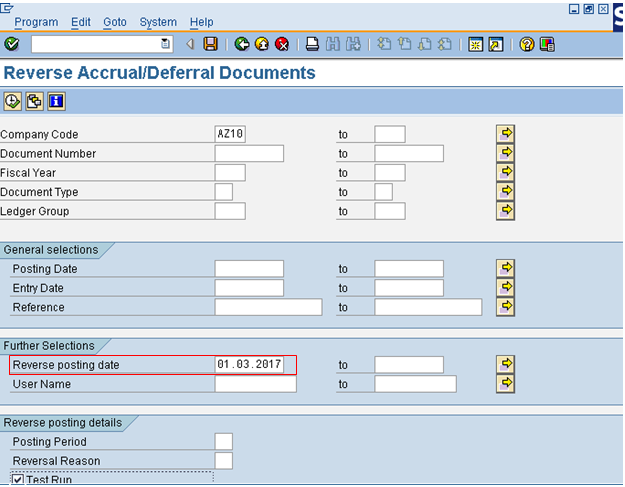
Finally, we should perform reversal of Accrual/Deferral document.
Menu Path: SAP Menu -> Accounting -> Financial Accounting -> General Ledger -> Periodic Posting -> Closing -> Valuate -> Reverse Accrual/Deferral Document
Transaction code: F.81
Now, we will reverse the rent provision. To do this, enter company code, reverse posting date, check test run checkbox and execute the transaction.
Reverse Accrual/ Deferral Document
After this, select reverse document button and we will get the message that the document was reversed, like shown below.
Message about the Number of Revered Documents
I hope this tutorial gives you a good understanding of the concept of SAP document reversal.
Fonte: https://erproof.com/fi/free-training/sap-document-reversal/

Tax jurisdiction

Purpose

The purpose of this page is to clarify the functionality of tax jurisdiction in SD.

Overview

In the following sections you will find information about the Customizing in SD and FI, Tax determination in the Sales document and Releasing to accounting.

Customizing in FI and SD

Customizing in FI

SPRO -> Financial Accounting -> Financial Accounting Global settings ->Tax on Sales/Purchases -> Basic settings 
  • Access Sequences
  • Define Condition Types
  • Define Procedures
The tax procedures are similar to SD pricing procedures. They contain all tax conditions that could appear in the SD document.
Examples:
  • TAXUS
  • TAXUSJ
  • TAXUSX
The Tax jurisdictions are necessary in countries were they are activated. Technically speaking:
  • The country has a Tax procedure assigned in transaction OBBG (field T005-KALSM)
  • If this Tax procedure has entries in transaction OBCO (table TTXD), then the country is relevant for Tax jurisdiction
It means that sales documents raised in this country should have:
  1. Tax jurisdiction conditions in pricing procedure
  2. The ship-to party should have tax jurisdiction in master data. In case of export, and the ship-to party has not tax jurisdiction, then a default should be set in transaction OBCL (see KBA 1672122)

Customizing in SD

The pricing procedure must include the trigger condition and the tax conditions. In this sample, in US: trigger condition UTXJ, tax conditions JR1, JR2, JR3, JR4
Examples:
  • RVAJCA Standard - CA /With Jur.Code    \  _ tax jurisdiction values calculated internally from FTXP
  • RVAJUS Standard - USA /With Jur.Code  /
  • RVAXUD Standard - USA /with Jur. ext.  \ _ tax jurisdiction values calculated by external tax system (Vertex, Sabrix, Taxware, etc.)
  • RVAXUS Standard - USA /with Jur. ext.  /

Trigger condition

Trigger condition is defined in V/06.
The purpose of trigger condition is only to set the tax code. The tax value will be build by conditions JR1, JR2, JR3, JR4.
 UTXJ is the trigger condition used in US. It is calculated on item level. In external calculation (from external tax system) it has value formula 300 assigned the pricing procedure. It is triggered in function Pricing.
Trigger conditions UTXD and UTXE are used in external tax calculation. Both conditions must be used together in the pricing procedure (for technical reasons). Condition UTXD has value formula 500 and condition UTXE has value formula 501. They are triggered only by FM PRICING_COMPLETE. The RFC is called only once per document. This is called the MaxTax procedure (developed by FI), and it is supposed to be faster.
 

Tax jurisdiction conditions

Tax jurisdiction conditions JR1, JR2, JR3, JR4 must be defined both in SD and in FI.
In SD the condition JR1 does not have access sequence. The amounts of conditions come from FI.
 

Determination of the amounts in a sales document

  1. Tax jurisdiction code is copied from the ship-to party or from OBCL
  2. Tax jurisdiction conditions are included in xkomv in form XKOMV_AUFBAUEN_STEUERN
  3. The system determines the tax jurisdiction amounts
  • from FTXP (in case of internal calculation)
  • from value formula 300 or 500 (in case of external calculation)

Relevant source code in Pricing

Note that after XKOMV_AUFBAUEN_STEUERN (LV61AA57), the base value and condition value are not determined yet.
The amount, base value and condition value are determined in XKOMV_BEWERTEN.
Inside XKOMV_BEWERTEN, the system determines the tax jurisdiction amounts
  • from FTXP (in case of internal calculation)
  • from value formula 300 or 500 (in case of external calculation)

Internal calculation

External Calculation

  • Formula 300 (FV64A300) is executed at item level.
  • Formula 500 (FV64A500) is executed at header level (Header -> Conditions) in the MaxTax procedure.
  • The RFC is only triggered by value formula 300 or 500. The value formulas 301, 302, etc. only retrieve values from the results determined by formulas 300 and 500.
Obs.: For external tax calculation it is recommended that the rate is maintained as 100% in FTXP.
Debug:
  1. Check what is the value formula assigned to the relevant tax jurisdiction condition. For example, tax jurisdiction condition XR1 is assigned to value formula 301 (FV64A301) in the pricing procedure.
  2. Set a breakpoint in the statement “call function 'GET_TAX_RESULTS_FOR_301_306‘”
  3. Create the SD document or update the pricing with pricing type ‘G’ (which redetermines the tax conditions), for example.
  4. Check the call stack. The values returned by GET_TAX_RESULTS_FOR_301_306  are only ‘effective’ when the value formula (FV64A301 in this example) is called by form XKOMV_KWERT_ERMITTELN.
Another way to debug:
  1. SE24
  2. Class CL_XTAX_RULES_RFC, Method RFC_CALCULATE_TAXES_DOC
  3. Set a Breakpoint at ‘call function 'RFC_CALCULATE_TAXES_DOC'
If condition control (technical field KSTEU) is ‘F’ or ‘H’, the external tax system is NOT called.
Note 1043372 changes KSTEU in the base formula so that the external tax system could be called.

Releasing to Accounting

Closer look at error message FF805

Set a watchpoint where the error message is issued and check structures BSEG and BSET.
In FI, BSEG contains line items and BSET contains the tax lines. If this structure does not contain a tax line, it is either because the condition has base value zero or is completely missing in SD.
There is a note (1255945) about how to create pure tax documents but it is very, very rare. This note clears xauto in SD and forward to FI. If xauto is cleared, the FI checks are not performed.
We could also check XACCIT when AC_DOCUMENT_CREATE is called.
Relevant fields:
  • TAXIT if it is a tax line.
  • TXJCD (different per level), TXJDP (the generic), TXJLV (the level)
  • XACCCR-FWBAS contains the base value.
Obs. 1: the trigger condition is never added to XACCIT
Obs. 2: the account determination for tax conditions is performed in FI
Example of XACCIT passed to FI with Tax jurisdiction:

Export cases with Tax Jurisdiction

The standard system behavior regarding the tax jurisdiction code for export cases has been changed with the following notes:
  • 1628962 - Export with invalid tax jurisdiction
  • 1768395 - Export with invalid tax jurisdiction (1)
  • 1809374 - Export with invalid tax jurisdiction (2)
  • 1899214 - Export with invalid tax jurisdiction (3)
  • 2016058 - Export with invalid tax jurisdiction (4)
  • 2095331 - Export with invalid tax jurisdiction (5)
After all these notes are implemented (via SNOTE or delivered in Support Package), the default tax jurisdiction code from OBCL is used in all export cases (instead of the ship-to party tax jurisdiction code) as a result of the corrections.
This data is transfered to the interface for the external tax system. Within this interface it is decided that for this default tax jurisdiction code, no call to the external tax system is needed as this business would always lead to a zero percentage rate.
In case another behavior is preferred (to not use this default tax jurisdiction code for these export processes) then you could use program MV45AFZZ for the order process and program RV60AFZZ for the invoice process. Consulting Note 2016990 has an example of a modification for export cases between US and Canada. Consider SAP Notes 83020 and 381348 in this regard.

Related Content

Related SAP Notes

SAP Note 392696: R/3 Tax Interface Configuration Guide
SAP Note 1899214: Export with invalid tax jurisdiction (3)
SAP Note 419124: Export billing document with tax jurisdictions

Fonte: https://wiki.scn.sap.com/wiki/display/SD/Tax+jurisdiction

domingo, 28 de janeiro de 2018

Finalmente! Com o SAP Screen Personas 3.0 SP6 você pode acessar as transações do ECC e S/4 em dispositivos móveis

Com o Screen Personas 3.0 SP6, transações Z ou standard SAP agora rodam no tablet e celular!

O ano está começando com uma notícia sensacional e muito esperada por muitos clientes SAP: ao apagar das luzes de 2017 a SAP anunciou o novo service pack do Screeen Personas, que finalmente suporta a utlização em dispositivos móveis! Sem sombra de dúvidas, esta foi a funcionalidade mais solicitada e desejada por todos que me perguntaram sobre as possibilidades do Screen Personas nestes últimos anos.

A novidade, chamada de “Slipstream Engine”, faz com que transações standard ou customizadas rodem como se fossem aplicações SAPUI5, ou seja, elas se tornam automaticamente adaptáveis para dispositivos móveis com interface touch (celulares e tablets). É possível rodar as transações em sua forma completa ou utilizando todas as incríveis possibilidades que o Screen Personas já trazia para torna-las mais simples e automatizadas.

É possível ainda rodar as transações a partir do Fiori Launchpad nos dispositivos móveis, e com isto as transações passam a ter acesso a funções nativas deste dispositivos, como câmera, GPS, etc.

A equipe interna do Screen Personas, na SAP, está validando e liberando aos poucos as transações standard para utilização através do Slipstream, mas mesmo as transações que ainda não estão homologadas podem ser executadas nos dispositivos móveis.


Uma revolução nas possibilidades de uso e de desenvolvimento

Na minha opinião essa é uma transformação radical, para melhor, nas possibilidades que o Screen Personas representa para qualquer empresa que use o SAP ECC ou S/4.
Como desenvolvedor ABAP e SAPUI5, vejo o Screen Personas como uma ferramenta para aplicar aqui e agora o conceito de low-code para desenvolvimentos que tem como ponto de partida alguma transação já existente no ECC ou S4.
Com o uso de ABAP e SAPUI5 (Javascript especialmente) combinados ao Screen Personas é possível criar soluções que usem todas estas tecnologias de forma totalmente transparente para os usuários, aumentando muito as possibilidades para os desenvolvedores e a produtividade para os usuários.
Se juntarmos os novos recursos em cloud, como consumo de APIs, hoje existe um mundo totalmente novo de possibilidades para criarmos soluções e produtos para as empresas.


Comprometimento com o suporte de longo prazo

Para reforçar a segurança que as empresas sentem ter ao adotar o Screen Personas, a SAP agora garante o mesmo tempo de manutenção e suporte que é garantido para o S/4 HANA, ou seja cinco anos a partir da data do lançamento do último service pack.
Como o Screen Personas 3.0 SP6 foi lançado em Dezembro de 2017, ele tem suporte e manutenção já garantidas até 31/12/2022. Pelo que vi no último encontro com a equipe interna do Screen Personas, já há planos para o SP7 e até SP8, então provavelmente este prazo será ainda maior.

Como dar o primeiro passo

Para experimentar em seu ambiente o que tudo isto representa é muito simples: se você tiver os requisitos mínimos de kernel, basta solicitar à sua equipe de infra-estrutura (basis) que instale o add-on do Screen Personas, em um ambiente onde existam dados de teste disponíveis, mesmo que seja um ambiente do tipo sandbox.
Com isso, é possível em poucos dias construir um cenário para prova de conceito (POC) e demonstração interna para líderes e demais stakeholders que possam apoiar e viabilizar iniciativas mais ambiciosas.
Eu acredito que toda empresa que usa o ECC ou S4 deve fazer isso, porque hoje nenhuma outra ferramenta da SAP apresenta tanto poder e potencial como o conjunto Screen Personas + ABAP + SAPUI5.
Além disso, o custo-benefício de se adaptar transações já existentes certamente será muito mais vantajoso usando o Screen Personas do que com a antiga abordagem baseada apenas em programação ABAP, ou apenas SAPUI5.

Fonte: https://blogs.sap.com/2018/01/22/finalmente-com-o-sap-screen-personas-3.0-sp6-voce-pode-acessar-as-transacoes-do-ecc-e-s4-em-dispositivos-moveis/