quarta-feira, 27 de janeiro de 2021

Statistical sales condition in Account Based COPA

 As mentioned in my previous post about Finance in S/4HANA 1809 I mentioned the release of statistical sales conditions in Account Based COPA. As many of you probably know, reporting on statistical conditions was one of the final gaps between costing based and account based COPA. With release 1809 this functionality is included, making account based COPA even better.

No alt text provided for this image

Configuration Steps

First of all, the extension ledger and the ledger group to post the statistical values should be configured first.

No alt text provided for this image

Activating processing of statistical conditions:

No alt text provided for this image

Configure statistical sales condition in the pricing procedure. Make sure to check the statistical and relevant for accounting indicators:

No alt text provided for this image

Assign an account key and configure the account determination in VKOA:

No alt text provided for this image

Now you should be ready to work with statistical sales conditions in accounting. Keep in mind that the posting is done only during invoicing. 

Creating and invoicing Sales Order with statistical condition

No alt text provided for this image

Posting during Goods Issue. Nothing unusual.

No alt text provided for this image

Posting during Invoicing. You notice a second accounting document posted on Extension Ledger 0C.

No alt text provided for this image

This is the provision posting for warranty costs coming from the statistical sales condition.

No alt text provided for this image

Usual revenue posting on the leading ledger:

No alt text provided for this image

Overview of the accounting entries:

No alt text provided for this image

Key takeaways

  • Statistical condition values are posted during invoicing. If you also have accounting entries for incoming sales order active (read here in my previous blog), you wont see the statistical condition values until you post the invoice.
  • Entries are statistical, they will only show up in reports and apps if you select the appendix ledger.
  • The provision side of the posting (balance sheet) will carry the material as dimension but not the sales order (see printscreen of Sales Order – Actuals App)

I think the addition of this functionality to account based profitability analysis is a reveal for customers who cannot switch completely to account based profitability analysis, because they are working with statistical conditions in sales and report on those in COPA reports.

Source: https://www.linkedin.com/pulse/statistical-sales-condition-account-based-copa-ugur-hasdemir/

Ready for Brexit with S/4HANA

 The UK has become a third country for the EU. All cross-border transactions between EU and GB (excluding Northern-Ireland) are classified as imports and exports.

In this post I would like to summarize the steps and checks you need to perform to make your S/4HANA or ECC system ready for Brexit. Of course, this heavily depends on if you have legal entities in the UK or do any business with the UK from an EU country.

If you have legal entities in the EU and/or GB the first things you need to do are:

  • Deactivate the EU flag for country GB
  • Change you VAT sales conditions. Sales to the UK should be considered export tax not EC sales anymore
  • Check changes related to Intrastat. UK is not relevant for Intrastat anymore
  • Northern-Ireland is still part of EU internal market. Northern-Ireland will be classified as XI. VAT numbers should start with XI following the existing numeric GB VAT number.
  • For GB company codes check the new introduced postponed accounting rules (OSS 2996657)

 If your trade falls under the NI protocol:

  • Northern Ireland will follow both EU as UK VAT system
  • NI Protocol is only valid for goods (not for services)
  • Update VAT numbers with prefix XI as mentioned above
  • Update all BP master records and organizational units from NI business with the region. Region codes are provided in the OSS note I will note below.
  • Implement a bunch of OSS notes for program corrections

 Important OSS note:

This is a central note about the Brexit. It describes also all other notes to be implemented for the Northern-Ireland protocol as well:        

  • 2885225 - BREXIT: Through the Transition Period and Beyond

This node makes program adjustment to the Intrastat program and also describes manual activities for Northern-Ireland:

-         2997204 - Intrastat declarations: End of BREXIT transition period on January 01, 2021

General Recommendations for Finance related to Brexit:

-         2768412 - Recommendations for Brexit in FI


Technical actions from Finance perspective explained in more detail

 1.      Change your company code settings and remove the EU indicator from country GB.

No alt text provided for this image

 Update XI VAT identification numbers (for Northern Ireland) should be stored in table T001Z (parameter XIVATN). 

 2.      Tax codes

Business between EU and UK is not considered intracommunity anymore. You should change your tax code determination and change it to export/import instead of intracommunity. For GB company codes, postponed accounting is introduced. For this you likely need to create new Tax codes. Details check OSS note 2996657.

 3.      Payment settings

The UK will remain in the SEPA area. Official EPC statement:

https://www.europeanpaymentscouncil.eu/document-library/position-papers/epc-decision-paper-brexit-and-uk-psps-participation-sepa-schemes

However, some minor changes apply. For payments over 1000 EUR outside the EU the payers address must be included in the payment data. The SAP delivered CGI SEPA CT formats already include the address field. Make sure that you vendor/customer master data is complete so the SEPA payment files get populated correctly. 

Source: https://www.linkedin.com/pulse/ready-brexit-s4hana-ugur-hasdemir/

SAP EWM PPF (Post Processing Framework)

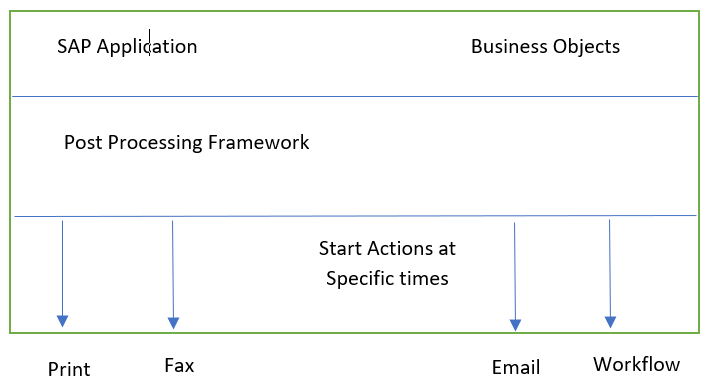
 The SAP EWM PPF (Post Processing Framework) is a tool for the generic execution of functions and processes. It provides SAP Extended Warehouse Management (SAP EWM) a uniform interface for triggering actions, such as printing pallet labels, delivery docket, pick ticket, or sending messages or faxes. The actions are generated if specific conditions occur for an application document. The SAP EWM PPF additionally provides triggering automatic subsequent documents and workflows. There is a status management and a processing log for every action.

SAP EWM PPF (Post Processing Framework)

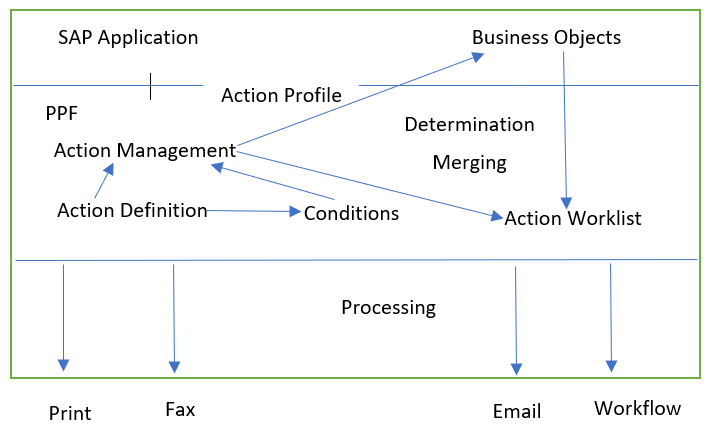
Components of SAP EWM PPF

The SAP EWM PPF has the following components:

Sample of SAP EWM PPF

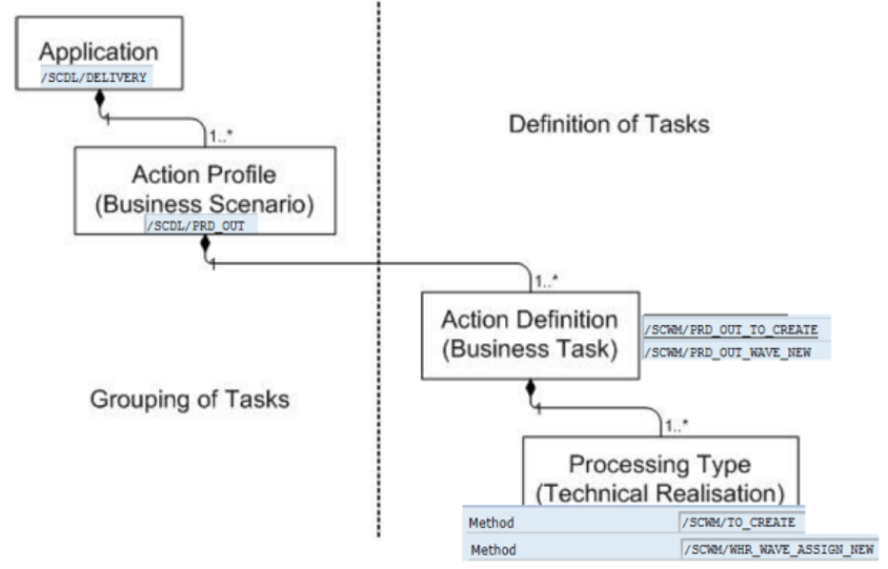
Action Profile

An action profile in PPF contains several action definitions, and the required set up for all the definitions of actions in that profile. In SAP EWM, the action profile that is available in the application is either hard-coded in the system or determined via SAP EWM-owned customizing.

Action Definition

The action definition tells us about the content of an action. It is a function or a process that is scheduled for an application document under specific conditions and is started either immediately or later. The processing generates the desired output format such as print, email, or fax, or executes some program logic.

Processing Time

The processing of an action can take place at different times. It can be started as soon as an action is scheduled. However, it is also possible for the action to be only scheduled initially. Processing can then be started later through the background job. The PPF framework offers the following processing time:

  • Immediate processing
  • Processing when saving document
  • Processing using selection report

Action Determination or Scheduling

The determination checks whether the conditions for scheduling the actions are valid. SAP EWM uses the scheduling called Business Add-Ins in the documentation of the PPF framework. This means that the action determination or scheduling condition is done according to the logic defined by SAP EWM application development.

Action Merging

Action merging is used to merge new actions or any actions in the action list which are not yet executed, according to specific criteria. Example: the data has changed, actions that were found when creating the document can be omitted and a new action is triggered.

Schedule Condition

In this case also if there are some scheduling condition, which is called to determine the execution of an action, then the system calls the PPF framework to check if the scheduling condition is fulfilled. If so, it schedules the execution of actions from the action profile. SAP EWM uses an application-specific logic to schedule actions.

The three steps for scheduling:

  1. Check that the action makes sense from the business point of view. For example, schedule warehouse task creation only for items that are relevant for picking or putaway (and not for the irrelevant items).
  2. Evaluate the respective customizing. For example, schedule automatic wave assignment for an outbound delivery order only when the warehouse process type is relevant for automatic wave assignment.
  3. Evaluate condition records. SAP uses condition records to determine actions for processing when decisions about the execution of an action, need to be very flexible. For example, printing.

You can also see the scheduling conditions that are defined in customizing for Extended Warehouse Management under Cross-Process Settings-> Delivery Processing -> Actions -> Change Actions and Conditions ->Define Conditions.

The schedule condition checks the condition techniques in customization to schedule the execution of the PPF action.

Start Condition

The start condition is checked before the action is executed. The action is only executed when the start condition has been fulfilled. This is the condition that is checked if TU is locked or not. If not, then the action is executed, also.

SAP EWM PPF in Application

There are some common applications in EWM for which PPF actions are used:

  • /SCDL/DELIVERY for all delivery-related actions;
  • /SCWM/SHP_RCV for transportation units, vehicles, and doors;
  • /SCWM/WME for core processes like warehouse orders, physical inventory, handling units, or value-added services;
  • /SCTM/FOM for transportation management in SAP EWM.

SAP EWM PPF Action

For these applications, you can configure the action profile you want to use for your business process. In the customizing for the Post Processing Framework (PPF), you can choose one of the action profiles provided by SAP or create your action profile. For example, to process the action profile for a particular document type of outbound delivery, it has to be assigned to a document type in customization.

Action profile /SCWM/FDO_01 is assigned to document type OUTB. When you save a document with document type OUTB or FDO, the system calls the PPF framework to execute the actions from this action profile.

You can see the action profile in customizing for Extended Warehouse Management under Cross-Process Settings -> Delivery Processing ->Actions -> Change Actions and Conditions -> Define Action Profiles and Actions.

Steps in SAP EWM PPF Set-up

  1. Configuration of Action definitions for each process under relevant action profile.
  2. Configuration of conditions for WO, HU, Wave, Delivery Processes, etc.
  3. Maintain condition records for each application and maintenance group through transaction code /N/SCWM/GCMC.
  4. All in one place customizing and configuration PPF application through Tcode: SPPFCADM.
  5. Monitor and execute PPF actions through SPPFP transaction code or use program “RSPPFPROCESS” to setup background jobs to run PPF actions.
Steps in PPF Set-up
Steps in PPF Set-up

Example of HU Label Printing Through PPF

In order to print the HU label through PPF, the following set up is required:

  1. Application /SCWM/WME in transaction SPPFCADM.
  2. Select Action Profile /SCWM/HU.
  3. Select Action Definition HU_LABEL.
  4. Maintain Condition Record in transaction /N/SCWM/GCMC with above action definition.
  5. Print the HU label either manually through /SCWM/Mon or automatically or through RF after the HU number is generated.

Final Notes

It can be concluded that the SAP EWM PPF is a tool for scheduling and monitoring actions like printing, email, fax, workflows, etc. Action determination and processing can be done either automatically or by scheduling a job. This is like the NACE functionality in ERP, which is used to trigger the program and forms to execute any action in an application. Similarly, in EWM, the PPF plays that role but in a greater aspect.

Did you like this tutorial? Have any questions or comments? We would love to hear your feedback in the comments section below. It’d be a big help for us, and hopefully, it’s something we can address for you in the improvement of our free SAP EWM tutorials.

Source:https://erproof-com.cdn.ampproject.org/c/s/erproof.com/ewm/free-training/sap-ewm-ppf/amp/

Creating a Predictive MRP Simulation with SAP S/4HANA

 When we start predictive material requirements planning (pMRP), the first step in the process is to create the pMRP simulation.


PMRP Compared to LTP

If we compare pMRP with SAP S/4HANA with long term planning (LTP), this step is somewhat similar to the creation of a long-term planning scenario; the difference is that the long-term planning scenario is created for a whole plant, whereas we can choose a restricted set of master data for our pMRP simulation. When we create the simulation, we select which top-level materials or work centers will be considered for pMRP.


Another difference between pMRP and LTP is that all the planning will happen during the simulation creation itself, whereas in LTP we first release the planning scenario and then execute the planning run (as many times as we want). In pMRP, we will be able to process the simulation immediately after the creation is finished and will not need to wait for a planning run.


A third difference is that whereas LTP generally runs with the same MRP type and lot-sizing procedure used by operational MRP, pMRP uses a simplified planning logic, in which all materials will use a deterministic MRP and a lot-for-lot procedure.


Creating a pMRP Simulation

Before the creation of the simulation, we need to ensure that the relevant master data has been created. It is also important to have planned independent requirements (PIRs) created: they will be the main input for the pMRP simulation. The system will plan the selected materials and determine the work center capacity requirements based on those PIRs.


Warning: When a simulation is created, master data will be copied into it, so subsequent changes to master data may not be considered.


The pMRP simulation creation is basically a background job that can be scheduled through the Schedule pMRP Simulation Creation app (see the application tile in the figure below). This application can also be used to manage background jobs that are already finished, scheduled, or in process.


pMRP Applications in the SAP Fiori Launchpad


As shown in the next figure, an icon will be shown in the Log column with the status of the finished background executions, and another icon is shown in the Results column. By clicking the icon in the Log column, we will jump into the job log, which will show the details of success, warning, or error messages that may have been triggered during each step of the simulation creation.


Application Jobs for pMRP Simulation Creation


The next figure shows the details of the simulation creation logs, including the success and error messages being triggered. When clicking the icon under the Results column, we will jump into the spool, where we will find a list of the materials and work centers selected for the simulation.

12

pMRP Simulation Creation Logs


We can create, copy, and delete a simulation creation (although deletion is only possible for scheduled jobs). During the creation of a new job, we can choose between two different job templates and, depending on the selection in the Job Template field, we will have different criteria.

Creation of pMRP Data via Top-Level Materials

Object selection is based on the material master, so selection criteria will be focused on the material master information, such as material number, MRP controller, or low-level code. The system will look for PIRs for the pertinent materials and run simplified MRP to determine the required quantity for each level and the capacity allocated in the work center.

Creation of pMRP Data via Work Center

Object selection is based on the work center, so the selection criteria will be focused on the work center. The system will look for capacity requirements in the selected work centers and then identify the top-level materials and the respective PIRs.


The next figure shows the creation of a new pMRP simulation based on the top-level materials and shows the job template selected. In the Scheduling Options section, we can define whether the job will be executed immediately or scheduled to run on a future date.


Creating pMRP Data via Top-Level Materials


Note: The creation of the pMRP simulation will be executed only once; therefore, it should not be executed as a periodic job, and the Recurrence Pattern value is set to Single-Run by default.


In the Parameter section, we fill the ID for Reference Plan and Simulation ID fields, which are used to identify the simulation. These should be unique values; the reference ID and simulation ID cannot be the same. The ID for the reference plan will represent the set of master data selected according to the selection criteria, and new simulations can be added later under the same reference ID. Under the Parameter section, we also need to select the bucket category (daily, weekly, or monthly buckets) and the start and end date for the simulation.


Under the Limits sections, we will find fields that can be used to restrict the selection. We can use those fields to ensure that pMRP will be executed only for materials with a specific BOM, routing, or material status, or for a BOM or task list usage. The Object Selection section contains the fields we will use to select the materials or work centers. Depending on the job template selected, we will see material-related fields (such as the MaterialPlantMRP ControllerMaterial Type, or Low-Level Code) or work center-related fields (such as Work CenterWork Center Category, or Person Responsible). We can also define if we will consider stock transfers in the scenario and which plants and which work centers from those supplying plants should be considered in the simulation.


Finally, under the Document Data section, we can choose if the opening stock will be zero, if it will be the safety stock or the actual material stock at the plant, if we will consider an inactive PIR version instead of the active version, and if the simple discontinuation will be considered.


Note: All those settings are defined in the reference plan during the simulation creation. They cannot be changed later when we are adding new simulations into the same reference plan.


Conclusion

Once we click the Schedule button, the background job to create the new simulation will be scheduled. Depending on the number of materials selected for the simulation, it may take some time because an actual planning run is being executed. We will see the simulation creation logs and the spool after the execution.

Source: https://blog-sap--press-com.cdn.ampproject.org/c/s/blog.sap-press.com/creating-a-predictive-mrp-simulation-with-sap-s4hana?hs_amp=true